Personally I found that doing custom editing in the LL Viewer to be very difficult and frustrating. In Firestorm, I can edit the colours while the dress is actually on my body. But with the LL Viewer, I had to take the dress off and rez it someplace before I could edit it. This is a clear step-by-step guide to how to do it. Since Phi sells mesh that is Modify/Copy, it's okay if you mess up a little. Because if you keep an !!Originals!! directory as per our recommendation you'll always be able to perform this step with a copy.
Phi had considered and actually successfully built a HUD to colour our dresses and it worked well. But we soon realized that the HUD would not give the fine controls the way the default editor provides, and after much tweaking decided to abandon the HUD and focus on a website that described how to do it in the two main viewers Firestorm and Linden Labs Viewer.
About each Design
Phi defines a design as a combination of three things:
(1) Style
(2) Pattern
(3) Hue
The STYLE is the layout and structure of the mesh. The PATTERN is a general arrangement of that has been placed on the mesh. The HUE is a colour variation of the original pattern.
This guide allows you to add a fourth element, COLOR. All non-Demo Phi Dresses come in Modify/Copy/No Transfer without a colour defined, it is always white, and this guide describes how you can use a Second Life viewer, in this case Firestorm, to change the white color to something else to give you a potentially different looking outfit or to tweak the colours slightly to match your existing accessories.

 This guide talks about how to the take the original dress shown to the left and apply a tint to it in order to produce the dress to the right.
While you can apply any depth of color ... be warned:
Step 0 - Don't Over Do It!
I put this step in to remind people to not over due it in the colour bar. The colour changes you might make should be really subtle, otherwise you will end up with something that looks yucky!
BEFORE YOU BEGIN, you will need to be able to do these steps in a second life area where you can rez objects. In the LL Viewer, you'll need to detach your dress, rez it, colour it, pull it back into inventory before you can wear it again.
Don't worry, this guide shows you every step along the way.
Step 1 - Click the Appearance Button

Step 2 - Select the Wearing Tab

Step 3 - Identify the name of the Phi Clothing Designs item you are wearing

Step 4 -Open your Inventory Window

Step 5 - Type the name of the Phi Clothing Designs item into the inventory search window. I recommend you type the full name as it will be easier to see what you created in a later step.

Step 6 - Right click the item and Select 'Detach'.

Step 7 - Drag the item to the ground or top of an object in a region where you can rez objects

Step 8 - Edit Your Object

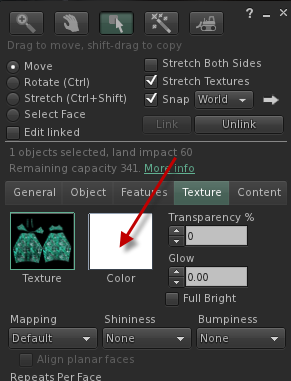
Step 9 - Select the Texture Tab

Step 10 - Click the Color Window (this allows you to "Tint" your dress). Here I use the word Tint because the dress itself has it's own color.
Step 11 - Drag the Dialog Box to someplace else. Often what happens is the LL Viewer will hide the dress you are editing by overlaying the dialog box on top of the thing you are editing. This is a reminder to move the dialog so you can see the changes you are making. This allows you to see the colour as you make changes to the outfit.

Step 12 - Adjust the Color of your outfit. There are a number of ways to do this. The easiest is to use the mouse to set the colour hue and brightness. There is also a brightness slider too. More advanced users can use the colour picker or adjust individual colour values using RGB or HSB scales.
It will take some experimentation before you find the right colours that work for you.

Step 13 - Once you are satisfied with your colour editing, click the General Tab. We'll want to adjust the name of your object so that you can quickly find it again according to the tint you just created.

Step 14 - Give it a New Name and remember to hit TAB to go to another field. Viewers will not remember the name changes if you don't do this step. *sighs*

Step 15 - Right-Click the dress, and "Take" the Item (back into Inventory)

Step 16 - Now "Wear" your new item. This is why it was important to type the full name of the dress when you were searching (Step 5). It makes the new dress appear on the next line or very close to where you were editing.

Step 17 - Ta Da! Now you have your dress with a light blue tint.

No comments:
Post a Comment
Comments are currently moderated to ensure good taste. If you don't like something or have an issue with our designs, contact me in-world or via ginger.alsop@gmail.com. Thanks.