At first a lot of people will balk at the L$250 I'm currently charging to be part of my group. But that's the introductory price for the group. It will go up in price as I add more outfits.
Group members, when there tag is enabled, will enjoy a 15% or more discount on everything. They get group gifts and specials. When the number of outfits drops below a certain amount the group discount might even change to be more savings.
The group is where you'll find out about designs that are going to be sold out and as soon as new designs are added to the store. The website is where you'll find out about new designs.
Saturday, September 29, 2012
Standard Sizing for Mesh
This article was passed to me by a friend in Second Life. It is unedited from the original text. It helps shoppers and designers deal with rigged mesh designs that don't quite fit an avatar.
Rigged Mesh is how clothing attachments work. The mesh is attached to the body according to a standard size. If you are large or small breasted, you often have to adjust your size to fit the dress; fill yourself out or reduce in size.
In the future, LL may offer Fleximesh. This is the ability for the mesh to adjust to your body shape. In October 2011, a Linden Lab official said that Fleximesh was desired, but caused too much lag except for the most powerful computers and to the best of our knowledge is not planned to be implemented for some time.
We are Minnu Palen & Thora Charron (of LeLutka), Siddean Munro (of SLink), Elie & Anouk Spot (of Mon Tissu) and Jaden Celoe & Shay Sibrian (of Celoe). With the rising popularity of rigged mesh clothing and accessories, we have discovered that it is difficult for shoppers to be sure that designers are creating mesh clothing in sizes that will suit their avatar shapes. Likewise, it is impossible for designers to know how to size their rigged mesh clothing because of the extremely wide range of shapes used in Second Life. In response, we have developed a solution: the Standard Sizing system. The following questions and answers will inform you about the details of this system and hopefully encourage designers to implement it and consumers to take advantage of it.
The following questions are answered below:
- What is Standard Sizing?
- What is the purpose of Standard Sizing?
- How do you know the Standard-Sized shapes are accurate?
- Where are XL and XXL?
- Won't we look like a bunch of clones if we're all using the same 5 shapes?
- Where can I get these shapes and how much do they cost?
- What if my own personal avatar size doesn't match one of the Standard Sizes?
- I am a creator. How do I make use of the Standard-Sized shapes, and how do I let my customers know I am using Standard Sizing?
- How do I let my customers know what Standard Sizing is?
- I create and sell shapes. Can I use the Standard-Sized shapes as a base for shapes that I sell?
(At the very bottom you will find the Standard Sizing measurements.)
- What is Standard Sizing?
Standard Sizing is a system created to standardize avatar shapes so that rigged mesh clothing can be created to fit most adult human female avatars and so that consumers will be able to objectively identify their own avatar with one of the Standard Sizes, enabling them to comfortably purchase rigged mesh clothing and accessories. We have created a group of 5 shapes representing the 5 most common adult human female avatar sizes in Second Life: Extra Extra Small (XXS), Extra Small (XS), Small (S), Medium (M), and Large (L).
- What is the purpose of Standard Sizing?
Creators and shoppers would benefit greatly from having a common language to communicate about sizing of garments and accessories for avatars. As a consumer, you can determine which Standard Size is closest to your favorite shape and buy clothing in that size. As a creator, you can fit your designs to the Standard Sizes, guaranteeing that they will fit a wide range of customer shapes.
- How do you know the Standard-Sized shapes are accurate?
The numbers we used to create the 5 Standard-Sized shapes were calculated using the results of a survey of over 500 adult human female avatars. The survey information focused on the following measurements: Body Fat, Torso Muscle, Breast Size, Love Handles, Belly Size, Leg Muscle, Butt Size, and Saddle Bags. Because rigged mesh responds to variations in Heights (including Height, Torso Length, and Leg Length) and Widths (including Body Thickness, Shoulder Width, Hip Width, etc.) on its own, these measurements were not included in the survey.
- Where are XL and XXL?
Based on our survey results, very few users identify their avatar shapes as XL or XXL. Limiting our sizes to XXS-L should make for an easier transition into widespread use of the Standard Sizing system. If a designer wanted to create clothing larger than Standard L, they absolutely could.
- Won't we look like a bunch of clones if we're all using the same 5 shapes?
Being able to express your individual personality and style through a unique avatar is one of the foundations of Second Life. We do not want to limit that any more than is necessary to provide a basic reference point for avatar sizing. Of the dozens of measurements that make up each person's shape, only 8 of them are relevant to each of the 5 Standard Sizes. Even those 8 can be tweaked and still fit that size. This allows a person to largely preserve their original shape, with the added benefit of knowing their Standard Size, and being able to shop comfortably for rigged mesh clothing.
- Where can I get these shapes and how much do they cost?
You can download all 5 of the Standard-Sized shapes for free from the Marketplace here: ( https://marketplace.secondlife.com/stores/100141 ). They are full permissions, so you are free to modify them or use the numbers as you please. However, note that making changes to the following measurements may compromise the way Standard-Sized rigged mesh garments fit you: Body Fat, Torso Muscle, Breast Size, Love Handles, Belly Size, Leg Muscle, Butt Size, & Saddle Bags (We recommend that these measurements be changed only slightly, if at all).
- What if my own personal avatar size doesn't match one of the Standard Sizes?
Your shape will most likely fit into one of the Standard Size categories. Since all rigged mesh clothing will probably include alpha bases, minor size variations of the 8 measurements listed previously will be will hidden, along with any glitching due to posing or animating. If this is not the case, you may want to modify your shape so that clothing fitted for a Standard Size will also fit you.
- I am a creator. How do I make use of the Standard-Sized shapes, and how do I let my customers know I am using Standard Sizing?
You can download the 3d files here ( http://dl.dropbox.com/u/6003454/Standard%205%20sizes.zip ). Once you load the Standard-Sized shapes into your 3d programs, you can build your clothing around them. Included in your download is an icon that represents your use of Standard Sizing. You can display this icon in your store, on your vendors, in your blog, etc. Hopefully, as Standard Sizing becomes more widely used, this icon will be easily recognized in the Second Life community. You can also have your store listed in the directory of shops offering Standard Sizing by filling out the form under "Stores/Creators", found here: http://bloggingsecondlife.wordpress.com/ . Be sure to check the boxes next to Standard Sizing and Mesh.
- How do I let my customers know what Standard Sizing is?
Feel free to distribute the information provided here any way you'd like!
- I create and sell shapes. Can I use the Standard-Sized shapes as a base for shapes that I sell?
Yes.
A directory of shops offering Standard Sizing can be found here: http://bloggingsecondlife.wordpress.com/?page_id=1363
If you have any questions or comments please join the in-world group "Standard Sizing System". This is a discussion group for Standard Sizing issues where you're free to voice any concerns or suggestions via chat.
Below you will find measurements for each of the 5 Standard-Sized shapes:
-XXS
Body Fat: 0
Torso Muscle: 21
Breast Size: 32
Love Handles: 22
Belly Size: 0
Leg Muscle: 40
Butt Size: 24
Saddle Bags: 22
-XS
Body Fat: 5
Torso Muscle: 31
Breast Size: 48
Love Handles: 25
Belly Size: 2
Leg Muscle: 45
Butt Size: 34
Saddle Bags: 30
-S
Body Fat: 7
Torso Muscle: 35
Breast Size: 52
Love Handles: 28
Belly Size: 3
Leg Muscle: 50
Butt Size: 38
Saddle Bags: 33
-M
Body Fat: 11
Torso Muscle: 38
Breast Size: 58
Love Handles: 31
Belly Size: 6
Leg Muscle: 56
Butt Size: 44
Saddle Bags: 36
-L
Body Fat: 24
Torso Muscle: 48
Breast Size: 71
Love Handles: 39
Belly Size: 14
Leg Muscle: 69
Butt Size: 62
Saddle Bags: 45
Inventory Management - Per Dress
Even if you have your own Second Life Inventory Management System (or if you don't), I strongly recommend that you create at least some kind of management system for the outfits that you do buy from us.
The reason is that Phi Dresses come Modify/Copy/No Transfer. If you learn how to add subtle colours to your dresses (with Firestorm [recommended] or with the Linden Labs Viewer), you can end up with a lot of different dresses and not know which ones are which.
The idea is very simple.
As soon as you get a dress from us, create a new subfolder within the folder we provide you, and call it "!!Originals!!".
Next, whenever you want to create a colour variation, you create a new subfolder with the colour variation as the name, and put a copy in there.
NEVER EVER edit anything in the Originals folder. That way no matter what you do you can always go back.
Custom Colouring - in LL Viewer
This guide will describe how to change the colour of your dress using
the Linden Labs Second Life Viewer. It was described using version 3.4; so if you
receive these instructions and are using in a different version they
should be close to what you will be using. If you are already a builder
in SL, you won’t need these instructions.
Personally I found that doing custom editing in the LL Viewer to be very difficult and frustrating. In Firestorm, I can edit the colours while the dress is actually on my body. But with the LL Viewer, I had to take the dress off and rez it someplace before I could edit it. This is a clear step-by-step guide to how to do it. Since Phi sells mesh that is Modify/Copy, it's okay if you mess up a little. Because if you keep an !!Originals!! directory as per our recommendation you'll always be able to perform this step with a copy.
Phi had considered and actually successfully built a HUD to colour our dresses and it worked well. But we soon realized that the HUD would not give the fine controls the way the default editor provides, and after much tweaking decided to abandon the HUD and focus on a website that described how to do it in the two main viewers Firestorm and Linden Labs Viewer.
Phi defines a design as a combination of three things:
(1) Style
(2) Pattern
(3) Hue
The STYLE is the layout and structure of the mesh. The PATTERN is a general arrangement of that has been placed on the mesh. The HUE is a colour variation of the original pattern.
This guide allows you to add a fourth element, COLOR. All non-Demo Phi Dresses come in Modify/Copy/No Transfer without a colour defined, it is always white, and this guide describes how you can use a Second Life viewer, in this case Firestorm, to change the white color to something else to give you a potentially different looking outfit or to tweak the colours slightly to match your existing accessories.

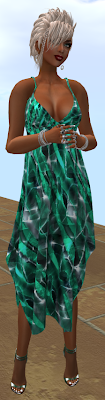 This guide talks about how to the take the original dress shown to the left and apply a tint to it in order to produce the dress to the right.
While you can apply any depth of color ... be warned:
I put this step in to remind people to not over due it in the colour bar. The colour changes you might make should be really subtle, otherwise you will end up with something that looks yucky!
BEFORE YOU BEGIN, you will need to be able to do these steps in a second life area where you can rez objects. In the LL Viewer, you'll need to detach your dress, rez it, colour it, pull it back into inventory before you can wear it again.
Don't worry, this guide shows you every step along the way.


Personally I found that doing custom editing in the LL Viewer to be very difficult and frustrating. In Firestorm, I can edit the colours while the dress is actually on my body. But with the LL Viewer, I had to take the dress off and rez it someplace before I could edit it. This is a clear step-by-step guide to how to do it. Since Phi sells mesh that is Modify/Copy, it's okay if you mess up a little. Because if you keep an !!Originals!! directory as per our recommendation you'll always be able to perform this step with a copy.
Phi had considered and actually successfully built a HUD to colour our dresses and it worked well. But we soon realized that the HUD would not give the fine controls the way the default editor provides, and after much tweaking decided to abandon the HUD and focus on a website that described how to do it in the two main viewers Firestorm and Linden Labs Viewer.
About each Design
Phi defines a design as a combination of three things:
(1) Style
(2) Pattern
(3) Hue
The STYLE is the layout and structure of the mesh. The PATTERN is a general arrangement of that has been placed on the mesh. The HUE is a colour variation of the original pattern.
This guide allows you to add a fourth element, COLOR. All non-Demo Phi Dresses come in Modify/Copy/No Transfer without a colour defined, it is always white, and this guide describes how you can use a Second Life viewer, in this case Firestorm, to change the white color to something else to give you a potentially different looking outfit or to tweak the colours slightly to match your existing accessories.

 This guide talks about how to the take the original dress shown to the left and apply a tint to it in order to produce the dress to the right.
While you can apply any depth of color ... be warned:
Step 0 - Don't Over Do It!
I put this step in to remind people to not over due it in the colour bar. The colour changes you might make should be really subtle, otherwise you will end up with something that looks yucky!
BEFORE YOU BEGIN, you will need to be able to do these steps in a second life area where you can rez objects. In the LL Viewer, you'll need to detach your dress, rez it, colour it, pull it back into inventory before you can wear it again.
Don't worry, this guide shows you every step along the way.
Step 1 - Click the Appearance Button
Step 2 - Select the Wearing Tab
Step 3 - Identify the name of the Phi Clothing Designs item you are wearing
Step 4 -Open your Inventory Window
Step 5 - Type the name of the Phi Clothing Designs item into the inventory search window. I recommend you type the full name as it will be easier to see what you created in a later step.

Step 6 - Right click the item and Select 'Detach'.
Step 7 - Drag the item to the ground or top of an object in a region where you can rez objects
Step 8 - Edit Your Object
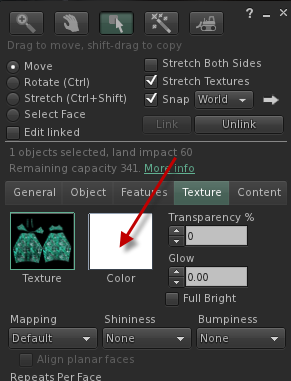
Step 9 - Select the Texture Tab
Step 10 - Click the Color Window (this allows you to "Tint" your dress). Here I use the word Tint because the dress itself has it's own color.
Step 11 - Drag the Dialog Box to someplace else. Often what happens is the LL Viewer will hide the dress you are editing by overlaying the dialog box on top of the thing you are editing. This is a reminder to move the dialog so you can see the changes you are making. This allows you to see the colour as you make changes to the outfit.
Step 12 - Adjust the Color of your outfit. There are a number of ways to do this. The easiest is to use the mouse to set the colour hue and brightness. There is also a brightness slider too. More advanced users can use the colour picker or adjust individual colour values using RGB or HSB scales.
It will take some experimentation before you find the right colours that work for you.

Step 13 - Once you are satisfied with your colour editing, click the General Tab. We'll want to adjust the name of your object so that you can quickly find it again according to the tint you just created.
Step 14 - Give it a New Name and remember to hit TAB to go to another field. Viewers will not remember the name changes if you don't do this step. *sighs*
Step 15 - Right-Click the dress, and "Take" the Item (back into Inventory)
Step 16 - Now "Wear" your new item. This is why it was important to type the full name of the dress when you were searching (Step 5). It makes the new dress appear on the next line or very close to where you were editing.

Step 17 - Ta Da! Now you have your dress with a light blue tint.
Second Life - Inventory Management 101
!!!! TAKE BACK CONTROL OF YOUR SECOND LIFE INVENTORY !!!!
THE PROBLEM WE ALL HAVE
Whenever you get landmarks and notecards, they go into the base folder and you quickly end up with a mess. With clothing you end up with a cube (an object with your items) or a folder off of your inventory. Without organization it takes forever to find things and at one point on an ALT I had over 8000 items and had no idea what I had ... drove be bonkers. So I created this system to handle it.
For clothes, it took about 3-4 hours to organize the 200 subfolders in clothing, jewellery and other things from the outfits I had at the time. Landmarks took a little longer because I wanted to verify they were all still valid. Notecards I generally just purged -- you seemgly get one everywhere you go. So generally, I used the Recent Items Tab of the Inventory to save the once I wanted to keep and just get rid of the rest.
I have been using the system for 4 years and it works great. I hope you can benefit from the result of how I dealt with my pain.
IN GENERAL
All of the three have a subfolder called “!!New!!” which sorts at the top of the list when sorting folders by name. When get new notecards or landmarks I want to keep, they go into that folder and I purge the rest. Once a week I purge, then move all the new notecards and landmarks into appropriately named sub-folders.
CLOTHING
Clothing contains 14 subfolders named. There are no other items in Clothing but for the subfolders, and if anything appears, I put it into “!!New!!”.
!!New!!
0-Glasses
1-Hair
2-a-Swimwear
2-b-Everyday
2-c-Formal
2-d-Provocative
2-e-Naughty
3- Jewellery & Accessories
4-Nylons & Stockings
5-Shoes
zzArchive
zzCubes
The subfolders allow me to dress myself one element at a time, with glasses being first ... I only have one set and they get knocked off occasionally, I just want to find them quickly. Then I move down the list selecting items as necessary ... a type of outfit, jewellery, nylons and finally shoes.
There are 5 different types of outfits (part #2). Swimwear, Everyday, Formal, Provocative and Naughty.
For new clothing outfits, I initially drag the folder of clothes i got with a "Buy" into the “!!New!!” folder. If it’s an object (got a Pay item), I create a subfolder with the same name as the object, and drag the items from the object (I call a cube) into that folder. I then rename the folder with the main colour of the clothing in upper case. When sorting by name, it clumps all of my RED items together, all my BLACK and so on. So I end with a name like "BLUE - Oriental Blue Dress".
I separate Naughty outfits from regular Outfits because based on how I feel naughty or nice -- since the naughty outfits can be rather skimpy, I don't want to have to accidentally put them on then have to take them off again. These folders are then subdivided into more subfolders, organized around colour. I have a "COLORFUL" folder for things that impossible to describe using one colour (such as 10 color combinations of a bathing suit) and a "MISC" folder for one to two outfits of a single colour, so I don't have dozens of folders with a single item in it. As the color grows beyond two outfits, I create a folder for that colour. This where the naming of the folder is really useful. The reason for this is just to keep the lists tidy.
Any notecards, textures, etc. I move into a folder called “zzOther” (so it sorts to the bottom of the list). I move the Landmarks to the "!!New!!" folder under landmarks, and if I’m lucky to get clothes that are COPY, I move all the clothing elements into a folder called “**Originals**” and create outfits or combinations as subfolders copying the contents from Originals into the appropriate folders. I just make it a habit to never modify the originals, make a copy and put it in as a combination.
If the outfit has a number of combinations in it, I will figure out the combinations and subdivide them into the appropriately. Combinations meaning different shirts, shirts with pants, shirts with a skirt, long shorts, short shorts, etc. This allows me at a glance to know what options I have. I don't bother with the incomprehensible descriptions some pieces of clothing have. I use "Blouse", "Skirt", "Pants", "Party Dress", "Skimpy Outfit", etc. For shoes, I generally take all the shoes I buy or get in an outfit and put them into their own separate folder so I can more easily mix-and-match. I use common sense when doing this, because there are some shoes/boots that are really hard to mix/match with anything else, or the outfit would look bad without those specific shoes. But in general this is what I do. If there are no combinations and zzOther, I create a subfolder called "!!Wear!!", otherwise ... I just leave the folder of items unaffected. No subfolders.
Finally, once I have set up the outfit, I drag it into the appropriately named color folder under Naughty or Outfits. In the future, I know that once it is in the appropriately named color folder I know I have already done all this other work. (btw, the best way to move the folder is to open another inventory window "File ::: New Window" and drag from one to the other.)
JEWELLERY
Jewellery is organized top to bottom with these subfolders:
0-Ears
1-Neck
2-Arms
3-Belly
4-Waist
5-Ankles
zzArchive
zzCubes
Within each of those, I use a color naming scheme similar to clothes above.
SOCKINGS
I don’t bother too much with a precise organization of Sockings because I have so few of them all. I just create subfolders to indicate what combinations I have, and leave it at that.
SHOES
Shoes are organized by the name/type of shoe/boot. However, one of the styles I own and recommend purchase is a "White Copy/Modify Pump style from BLAZE". With White, I can make hundreds of new types to match my clothing selections ... by coping and colouring to the shades that I need. I have about 12 shades now, and typically matches the colours of the main styles I wear. In that case I have a folder called BLAZE, a subdirectory called "**Originals**" and each clother combination is in a sub-folder organized by shoe color. If I different shades of RED I'll describe the sub-folder as "RED - Dark" and "RED - Light". Next I just right-click the color and select WEAR to wear that color.
zzARCHIVE
zzArchive are outfits that I just don’t wear anymore because of low quality or the style just isn’t me anymore. zzArchive gets split into two subfolders TRANSFER and NO TRANSFER. Transfer stuff I usually give away, and no transfer I typical keep even though I would probably never wear them again. Who knows? They are out of the way anyway or may come back into style.
zzCUBES
zzCubes is where I put the boxes that objects of clothes came from (especially copy/modify). I delete the ones that have nothing left, and purge the rest. Landmarks get moved to !!New!! in the Landmarks folder, because that’s where I look when somebody asks for suggestions. I generally leave notecards with the clothes.
Therefore, if I buy an “Blaze* Vivace Aqua Dress”, I:
(1) Move the folder to “!!NEW!!” in the Clothing Directory, then move the object/cube to “zzCubes” if appropriate.
(2) Rename the folder “AQUA - Blaze* Vivace Dress”
(3) Determine the various combinations and create folders for them so that dressing is much easier to do.
(4) Drag the organized folder into BLUE. Therefore if it is an outfit it’s dragged to:
Clothing ::: 2-Outfits ::: AQUA ::: AQUA - Blaze* Vivace Dress
*-*-*-*-*-*-*-*-*-*-*-*-*-*-*-*-*-*-*-*-*-*-*-*-*
I have been using this system since September 2008 and have modified it here and there. I works well for organizing thousands of items -- especially clothes.
If the system works for you, Great! If not, modify it and take back control of your Second Life Inventory.
Custom Colouring – In Firestorm
This guide will describe how to change the colour of your dress using the Firestorm viewer. It was described using version 4.2.2; so if you receive these instructions and are using in a different version they should be close to what you will be using. If you are already a builder in SL, you won’t need these instructions.
Phi had considered and actually successfully built a HUD to colour our dresses and it worked well. But we soon realized that the HUD would not give the fine controls the way the default editor provides, and after much tweaking decided to abandon the HUD and focus on a notecard that described how to do it in the two main viewers Firestorm and Linden Labs Viewer.
Phi defines a design as a combination of three things:
(1) Style
(2) Pattern
(3) Hue
The STYLE is the layout and structure of the mesh. The PATTERN is a general arrangement of that has been placed on the mesh. The HUE is a colour variation of the original pattern.
This guide allows you to add a fourth element, COLOR. All non-Demo Phi Dresses come in Modify/Copy/No Transfer without a colour defined, it is always white, and this guide describes how you can use a Second Life viewer, in this case Firestorm, to change the white color to something else to give you a potentially different looking outfit or to tweak the colours slightly to match your existing accessories.
I put this step in to remind people to not over due it in the colour bar. The colour changes you might make should be really subtle, otherwise you will end up with something that looks yucky!


 This window gives you presets, a colour grid affecting hue and brightness, specific brightness controls and you can even be geeky by selecting specific Red, Green, Blue, Hue, Saturation, Luminosity, LSL, or Hex values. OMG.
The thing about the colour window is the colour you select will alter the existing colours. Like adding them together, for example, PINK + YELLOW produces a RED result. I could explain why, but the best thing to do is just try. You’ll find that the best colour combinations are only slight colour changes from white, rather than significant colour changes.
Don’t forget to click OK when you are done.


Phi had considered and actually successfully built a HUD to colour our dresses and it worked well. But we soon realized that the HUD would not give the fine controls the way the default editor provides, and after much tweaking decided to abandon the HUD and focus on a notecard that described how to do it in the two main viewers Firestorm and Linden Labs Viewer.
About each Design
Phi defines a design as a combination of three things:
(1) Style
(2) Pattern
(3) Hue
The STYLE is the layout and structure of the mesh. The PATTERN is a general arrangement of that has been placed on the mesh. The HUE is a colour variation of the original pattern.
This guide allows you to add a fourth element, COLOR. All non-Demo Phi Dresses come in Modify/Copy/No Transfer without a colour defined, it is always white, and this guide describes how you can use a Second Life viewer, in this case Firestorm, to change the white color to something else to give you a potentially different looking outfit or to tweak the colours slightly to match your existing accessories.
Step 0 - Don't Over Do It!
I put this step in to remind people to not over due it in the colour bar. The colour changes you might make should be really subtle, otherwise you will end up with something that looks yucky!
Step 1 – Open Your Inventory
Step 2 – Select the Worn Tab
Step 3 – Open the folder next to your Phi outfit
Step 4 – This reveals the worn contents
Step 5 – Right-click the Mesh, and select Edit
Step 6 – Click the Texture Tab
Step 7 – Click the Colour Box
Step 8 - Play
The thing about the colour window is the colour you select will alter the existing colours. Like adding them together, for example, PINK + YELLOW produces a RED result. I could explain why, but the best thing to do is just try. You’ll find that the best colour combinations are only slight colour changes from white, rather than significant colour changes.
Don’t forget to click OK when you are done.
Step 9 - Examples
Friday, September 28, 2012

Monday, September 24, 2012


Monday, September 17, 2012


Coming Soon - "The Nazzie"


Sunday, September 16, 2012
Coming Soon ... "Shells" in Red

Thursday, September 13, 2012
New Clothing Shop in the Works
Well, I have been working very hard to come up with my new store. I've changed my mind about 80 times on how it will work.
Each Phi will sell several mesh styles. Each style will have a pattern. Each pattern will have a color. A design is a particular color of a given pattern for a specific style.
Each design will be limited edition and have 100 copies. (In the future, we might offer more copies of a given design; but at the onset, we will offer only 100.) Once it is sold out, it won't be offered again, but the pattern might be offered in a different colour. Each design will have a price (probably $399) and a group refund of at least 15%. If you are a group member, and purchase a dress without the group enabled, you will not get a refund; nor will the store offer cash back if you forget.
Look for a store opening late September or early October 2012.
Saturday, September 8, 2012
Who is Phi Clothing Designs?
Back in 2009, my first attempt at designing clothing in Second Life was such a disaster that I figured I'd never do it again. Then a friend of mine started designing pants, and described a multi-hour process to fitting the pant design to the clothing template. This is because the template is not square, it's a polygon, which means a manual texturing of the texture to fit the polygon. While it's possible to use Photoshop to spread the texture over the polygon, the problem is the process often smears the texture making the seams hard to align, and it's awfully challenging to get the seams to align. This is why many designers have stitch lines or dark areas along the seams so it looks okay when the texture is applied.
But not at Phi. At Phi, it took us 2 years (no full time of course) and 3 major versions to create a process to blend textures into these odd shaped polygons so that the textures align. In our October 2013 reboot, we optimized our clothing process while making the clothing buying and using process as easy as possible. 3 BETA testers evaluated the system and found it seamless. Now it's your turn.
We also went to a FREE model. The HUD is FREE and copiable (no transfer). Each OUTFIT is FREE and copiable (no transfer). What you pay for are the patterns/fabrics. You don't buy one colour, you get 8 hues in a pack. We also sell FATPACKS, 6 designs in a pack, and save even more money. So one FATPACK is actually 48 different dresses.
The HUD makes it EASY to manage the hundreds of variations you could buy, get as group gifts or give-a-ways
We don't do conservative design. Our patterns are eye popping, wild and colourful, using complex shapes and styles. Because we match seams, this allows the patterns to be large and seamless themselves. When you tie this to seamless texture mapping you'll see very quickly how we are very different.
As of October 2013, we have 4 mesh outfits, 30 patterns and 240 variations. With significant increases in productivity, we will be able to offer more outfits more quickly. Hours, instead of weeks. Want the latest designs? Check out Phi first.
Subscribe to:
Posts (Atom)